
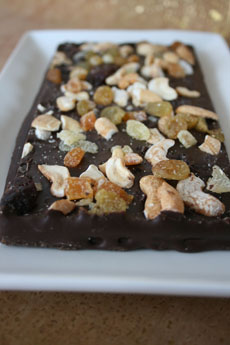
 Semisweet chocolate topped with cashews, raisins, sultanas, orange and crystallized ginger. Photo by Hannah Kaminsky | THE NIBBLE. Semisweet chocolate topped with cashews, raisins, sultanas, orange and crystallized ginger. Photo by Hannah Kaminsky | THE NIBBLE.
May 2010
Last Updated April 2017 |
|
Mendiant Or Chocolate Bark
A Recipe For Delight
Chocolate Bark History
Mendiants (the French word for “mendicant”), called chocolate bark in English, are bars or disks of chocolate studded with nuts and dried fruits. Sometimes candy used: Peppermint bark is a popular example.
Unlike chocolate bars, that enrobe the nuts and fruits, mendiants are made so that the beauty of the different nuts and fruits are studded provide visual appeal as well as complex flavor.
Aside from being a delicious way to enjoy chocolate, mendiants have a historic significance. Originally made as Christmas candy, the colors of the nuts and fruits referenced the color of the monastic robes of the orders of the Augustinians (hazelnuts), Carmelites (almonds), Dominicans (raisins) and Franciscans (dried fig) Today, a wider palette of fruits, peels and seeds are used.
Mendiants are typically made into large slabs and then broken into smaller pieces (bark). Some chocolatiers make them into individual chocolate bars and round disks.
Most of us would turn into beggars and ask for another piece...and another.
This recipe is adapted from Field Guide To Candy by Anita Chu. You can make it up to a week in advance and store in an airtight container in a cool, dry place.
Once you get the hang of making bark, it may become one of your favorite confectionery pursuits. The potential combinations of flavors—and opportunities for your artistry—are endless.
And it makes it easy to celebrate certain food holidays, like National Chocolate Cashew Day (April 21st), if you’re O.K. with the cashews on the chocolate.
Chocolate Bark Recipe
Plan your recipe by starting with your favorite chocolate: dark, milk or white (the better quality the chocolate, the finer the end product).
Then, plan your inclusions. Choose from your favorite flavors:
- Candy: crystallized ginger, dragées, peppermint, novelty candies (yes, you can use gummy worms if that appeals to you, or M&Ms), seasonal candies
- Chocolate: For a chocolate-on-chocolate effect, contrast colors and forms (milk chocolate morsels on a dark chocolate base, chopped white chocolate atop dark chocolate, etc.)
- Dried fruits and citrus peel
- Nuts: raw, salted, honey roasted
- Salt: sea salt, chopped salted pretzels
Ingredients
- 14 ounces chopped quality chocolate
- 1-3/4 cups inclusions
Preparation
- Line a baking sheet with parchment paper.
- Melt and temper the chocolate (see notes below). Tempering, rather than simply melting, the chocolate is crucial to keeping the shine on the chocolate.
- Pour chocolate onto the baking sheet, aiming for a rectangular shape, and spread to 3/8" thick.
- Arrange inclusions on top of the chocolate. Here’s your chance to create decorative patterns—or go freestyle and just sprinkle the mixed inclusions over the chocolate.
- Lightly press the inclusions into the chocolate, so they’ll stick. Let set at least one hour.
- When chocolate has solidified, you can break it into pieces with your hands or with a small, sharp knife. Makes about 24 pieces.
How To Temper Chocolate
- Finely chop the chocolate. In general, 1-1/2 to 2 pounds is an ideal size to work with. It is more difficult to control the temperature with smaller or larger amounts.
- Place 2/3 of the chocolate in a double boiler over simmering water. If you don’t have one, you can put a metal bowl atop a pan of water. In either case, be sure that the water does not touch the bottom of the metal above it.
- Place a candy thermometer into the chocolate. The temperature should not exceed 120°F for dark chocolate or 105°F for milk and white chocolate.
 Stir frequently with a spatula. When the chocolate is fully melted, remove bowl from heat and wipe condensation from the bottom and sides. Put a lid on the bottom pan so the water remains simmering. Stir frequently with a spatula. When the chocolate is fully melted, remove bowl from heat and wipe condensation from the bottom and sides. Put a lid on the bottom pan so the water remains simmering.
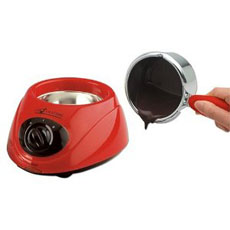
MAKE IT EASY: A chocolate-melting machine like the one at the right is just $18.89, and melts up to 10 ounces of chocolate at a time. Buy it on Amazon.com. for about $26.00, the Wilton chocolate melting pot has a 2-1/2 cup capacity. The machines can be used to dip cookies marshmallows, pretzels, potato chips and other treats in chocolate. Both make it easy to melt chocolate for recipes, without risk of scorching the chocolate. Larger models for chocolate tempering are available in the hundreds—and thousands—of dollars. - Stir in the remaining chocolate a bit at a time, allowing it to thoroughly melt before adding more.
- Let the chocolate cool to 82°F. If it is warmer, keep stirring it until the temperature lowers. If it is cooler, begin reheating (see next step).
- When the chocolate is 82°F, place it over simmering water. For dark chocolate, heat to 88°F to 91°F. For milk and white chocolate, heat to 85°F to 87°F. Remove bowl from heat.
- Spread a small spoonful of the chocolate on a piece of wax paper. If it dries quickly with a glossy finish and no streaks, it is in temper. If it is dull with streaks, you need to re-temper it, beginning with How To Temper Chocolate Step 2.
- Immediately proceed to Preparation Step 4 and add the inclusions. Tempered chocolate must be used before it cools and sets. Otherwise, you need to re-temper.
R
|

