Advertisement
THE NIBBLE (TM) - Great Finds for Foodies (tm)
  Sign Up | Contact Us | Email To A Friend  
       
RSS feed What’s This?


barbeque
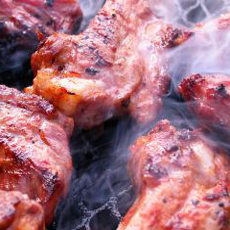
Mouth-watering barbecue. Photo by Peter Hellebrand.
MENU


Meat & Poultry

Category Main Page
Articles & Reviews


Main Nibbles

Main Page
Articles & Reviews Of Foods From A To Z


Product Reviews

Main Page
Foods, Beverages, Books,
News & More


Home Page

Link To Other Sections:
Newsletter, Marketplace,
Food Fun, Home Zone


ABOUT THE AUTHOR
PHYLLIS HASKINS, who teaches and writes on the fine art of barbecue, is the co-owner of Teddy Bear’s BBQ in Monroe, Washington. She and her husband Konrad have won more than 70 awards in BBQ competition since 2002. To study BBQ with the masters, e-mail Phyllis.


June 2006

Product Reviews / Main Nibbles / Meat & Poultry

The Basics Of Barbecue

It’s A Craft With Technique...And A Lot Of Fun


Learn The Basics, And Barbecue A Perfect Chicken


Editor’s Note: There’s a lot to learn to master the grill. Author Phyllis Haskins teaches classes, and we’ve recommended several books.


Many people make barbecue a complex, almost mystical process. Even though our roots are in the world of competitive barbecue (under the name Teddy Bear’s BBQ), we started The BBQ Institute in 2004 to help cooks cut through the sometimes-conflicting information that surrounds the world of barbecue, and to provide simple, stress-free procedures for cooking mouth-watering dishes for friends and family using home equipment.

We are great believers in simplicity. The simpler the process and the recipe, the easier it is to repeat the same great results. Complex recipes are a deterrent for many people. We want as many people as possible to enjoy great barbecue as often as possible.

Demystifying Barbecue


Great Smoke Flavor Requires The Right Wood

The trademark of “real barbecue” is the presence of smoke in the cooking process. Smoking woods of choice come from seasoned hardwood, preferably fruit- or nut-bearing trees: apple, cherry, guava, hickory, maple, pecan and oak. Mesquite and alder are weed trees popular because of the plentiful supply of cheap or free fuel—the best barbecue doesn’t use them.

  • A smoker running as intended should generate no smoke or a barely visible trace of blue smoke—the smoke in the photo above looks romantic, but if your smoke resembles a steam train we hope you like a really strong smoke flavor (most people do not).
  • Using the wrong kind of wood can be hazardous to your health: stay away from anything evergreen because it will release harmful resins into your food.
  • We are not big fans of smoke from damp wood chips. We prefer to use dry chunks placed next to the charcoal or propane flame. If all you have is chips or pellets, our favorite trick is to use a small cast iron spoon rest. The spoon rest looks like a miniature cast iron frying pan. Fill it with dry chips or pellets, wrap in a double layer of foil and poke a single toothpick size hole furthest from the handle.  Place the handle directly over the heat source.

Wood or Charcoal vs. Gas

Some purists feel that using gas is not real barbecue. Maybe it’s not from a traditionalist’s standpoint; but if you know what you are doing, you can turn out food that tastes just as good with gas or wood as a heat source.  As an example, we love the new portable Weber Q gas grill: it sits proudly next to our charcoal kettles and it cooks fantastic chicken!

Weber Q Gas Grill
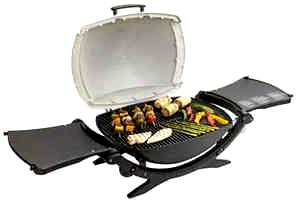
The Weber Q portable propane gas grill with an enameled cast-iron cooking grate does the trick. Click here for more information or to purchase.

“Low and Slow”

“Low” refers to the cooking temperature, which in the barbecue world is in the 225º to 275ºF degrees range. Chicken, which we will be focusing on later in this article, needs a little more heat to get the skin to a point that is crisp and nice to eat. If you maintain a constant low point of 200ºF, food can dry out and stay in the “Danger Zone” too long*. Many experienced cooks these days achieve winning results breaking the low temperature rule. You just need a little knowledge and experience to successfully use higher temperatures.

*The danger zone refers to the temperature at which bacteria and their associated toxins multiply rapidly. It is usually recognized as 42ºF and 139ºF. Food should not be kept at these temperatures for an extended period of time.

“Slow” means a cooking time of anywhere from 2 hours for a whole chicken to 10 hours for a pork shoulder. However, don’t get hung up on time. The meat is ready when it is safely cooked based on internal temperature AND has achieved the desired texture and tenderness.

Tools Of The Trade


Grill

All you need is a grill. Almost any grill will work. We’ve cooked great barbecue on cheap propane grills and small portable charcoal kettle grills. An experienced pit master can get great results with nothing more than four bricks, the shelf out of an oven, and a bag of charcoal. Better equipment makes life easier, of course.

  • The benchmark of better equipment is not price.  For propane cookers we look for temperature control and a design that will avoid flare ups. 
  • For charcoal and wood cookers we look for an airtight design that does not need Cookshackfrequent fresh fuel and will maintain a constant temperature between fuelings.  Any product made by Weber fits the bill. (Exception:  The Go-Anywhere by Weber, their cheapest model and one to avoid.)
  • Our cooker of choice:  The Cookshack FEC-100, an electric pellet smoker with a temperature dial that goes from a low smoke setting up to 350°F. With its vertical cabinet design, this smoker can handle briskets, pork shoulders, chickens, and ribs—all at the same time. The stainless steel surface is easy to clean, and the pellets provide a sweet smelling, clean burning heat source.  (Editor’s Note: This is a $2,900 smoker oven for caterers and competition cooks, holding up to 100 lbs. of pork butts, 80 lbs. of brisket, 60 lbs. of ribs or 24 chickens.)

Learn Your Grill’s Sweet Spot

Whether your grill is $150 or $1,500, your first step is to find its “sweet spot.” Buy the cheapest generic store brand biscuits, the kind found in a roll in the refrigerator case. Preheat your grill to its lowest setting (225°F to 300°F). After it is preheated, lay the biscuits out equidistant from one another all over the cooking grate.  Close the lid and check every 15 minutes.  You will be able to see which biscuits are nicely browned, which are burning, and which are not yet cooked.  This test will clue you to the cool and hot spots of the grill.

The Thermometer: A “Must Have” Tool

A meat thermometer tells you two things: the internal temperature of the meat and how tender the meat is, based on how easily the probe goes into the meat. In this day and age digital thermometers are far better than the old dial thermometer. Regardless of type, a regular check of calibration is the best route to food safety. A cup full of ice chips and water at 32°F/0°C is a better test than boiling water, where the temperature changes with altitude.

Our Favorite Thermometers

  • The inexpensive choice is Taylor Digital.
  • The intermediate choice is Thermapen: you are paying for an accurate reading in 1 second instead of waiting for 10 seconds with the Taylor.
  • The deluxe choice is BBQ Guru: the Ferrari of thermometers developed specifically for barbecues.

The low-end thermometer will keep your charcoal cooker on temperature. The mid-priced model will control your charcoal cooker’s temperature, monitor the meat temperature and drop into a hold mode when the desired meat temperature is reached. The deluxe model not only monitors what’s going on in the grill, but controls the temperature with a separate fan (shown in the photo below, right) so you don’t have to be present to tend to the cooker.

Taylor Tru-Temp   BBQ Guru
TruTemp Instant Read Digital
Thermometer.
Click here for more information or to purchase.
  BBQ Guru. From $125.00 for an entry level control to $600+ for a wireless (radio) control. Click here for more information or to purchase.

Prices subject to change.

Four Cardinal Sins of BBQ

No matter what you read elsewhere, or what you’re told by trusted friends, promise us you will not transgress by:

  • Using Charcoal Lighter Fluid or Match Light® Charcoal. Lighter fluid will impart an off flavor to anything cooked over it. We use a charcoal chimney with great success. It’s a very fast, clean way to light charcoal.
  • Boiling The Meat. When you boil meat you are making stock and the flavor stays in the water. The boiling of meat was a technique pushed by magazines starting after World War II, to make sure the meat was thoroughly cooked when grilled over high heat. Learning to cook with indirect heat and instant-read digital thermometers has rendered this flavor-robbing technique obsolete.
  • Bronco Bob'sSaucing Raw Meat. Most barbecue sauces are high in sugar. Using sauce early normally results in an unappetizing black carbon crust sometimes referred to sarcastically as “perfect caramelization.” The best way to get flavor into the meat is with a spice rub and/or marinating. Sauce is best left for the last 15 to 30 minutes of cooking.
  • Clock-Watching And “Sneaking a Peek.” Cooking great barbecue is different from following a cake recipe. The meat is done when both the desired internal temperature and tenderness are achieved, not when the timer goes ”ding.” Cooking with indirect heat greatly reduces the chance of burning; constantly lifting the lid means the temperature is constantly dropping. We often hear horror stories of meat taking forever to cook; almost always it is caused by constant lid-lifting.

Cooking Barbecue Chicken

Barbecue Meat Cuts

Probably the most popular and easiest meat to prepare for friends and family on the barbecue is chicken.  As an appetizer on skewers or as the main course, chicken is simple and delicious with a few basic tricks. Chicken is also relatively cheap, making it a great meat to practice and experiment with and eat the results without waiting for hours.

While our focus today is chicken, here’s a quick word about the other BBQ meats, pork and beef, which fall into two very distinct groups based on tenderness.

  • Classic barbecue cuts include beef brisket, chuck roll and pork shoulder. These cuts are inexpensive because they are fibrous and tough and need to be cooked for a long time to tenderize them—but once the fibers are broken down by cooing, the flavor is delicious and more flavorful than pricier cuts. You can’t serve (or chew) these cuts with some pink in the middle: the only way to get them tender is to break down the connective tissue by cooking them to an internal temperature of 190ºF to 200ºF. This means the meat is definitely well done.
  • Tender cuts, which are more expensive, include whole top sirloin, whole rib eye, tri-tip, prime rib, pork tenderloin and filet mignon. These are the cuts to consider if you want some pink or red meat or just want the horns knocked off. They do benefit from cooking indirectly with wood smoke. As tender cuts don’t have connective tissue to break down, which adds flavor and moisture, cooking indirectly at a hotter temperature of 300°F to 350°F helps to preserve the moisture.

Technique


Temperature Targets

  • Chicken: White meat, 165°F; Dark meat, 175°F (although these are the safe temperatures you may need to go higher to get the blood cooked out of the joints)
  • Beef: Rare, 125°F; Medium rare, 135°F
  • Pork: 150°F

Tough cuts such as beef brisket and pork shoulder need to be cooked to 190°F to 200°F and for a long enough period to allow the connective tissue to break down.

Resting And Bounce

Resting is in the arsenal of the classically trained chef and helps every cut of meat. Even a drumstick rested for 10 minutes is better than straight off the grill. Resting allows the juices in the meat to redistribute.

Bounds utensilsBounce is where the cooking temperature and the outside of the meat is significantly higher than the core temperature of the meat. When you take the meat of the heat and rest it, the core temperature rises as the higher outside temperature works it's way to the core. Allow for this by polling at 5° to 10° lower than you desire or dropping the cooking temperature as you get to your desire internal temperature.

Tough cuts such as beef brisket can get to the target temperature of 195° to 200°F and still be tough because the connective tissue has not broken down. In this case wrap in foil and hold at 200°F until the meat gets tender. Also if using a leave-in thermometer, expect to reach a plateau where the heat going into the meat is breaking down the connective tissue and the temperature will stall around 165°F for an extended period.

This handsome, stainless steel basting brush with heat-resistant silicone bristles is ideal for barbecues. from William Bounds, $14.95. Click here for more information or to purchase.

Technique


Here’s how we’d prepare the perfect barbecued chicken.

Choosing Your Chicken

DrumsticksFresh. Fresh is wonderful as a place to start a recipe that involves marinating or brining.  Without the help of marinating or brining, fresh chicken is very easy to overcook and does not hold well, resulting in unappetizing, dry chicken. Kosher chicken has already had salt added and can be considered brined.

Chicken Broth Added. Our favorite type of chicken to buy for the barbecue has chicken broth added. The label will say “X% chicken broth added.” This kind of chicken requires no prep and is very forgiving to cook and hold. Two common brands of this type are Tyson® and Purdue®. We normally use Tyson®, which is widely available. You can use the Not so Basic Brine (recipe below) on broth-added chicken; just use half the salt when making the brine.

If you have fresh chicken without broth added, soak the chicken for 12 to 48 hours in the refrigerator in Not So Basic Brine, or marinate overnight. Bottled Italian salad dressing is a favorite marinade of competition barbecue cooks.

Whole Or Pieces?

The benefits of cooking individual pieces:

  • The rub and the smoke evenly cover the entire piece of the meat. 
  • Cutting up whole chickens takes time, so pieces cut up by the grocery store win on the convenience factor.
  • White and dark meat cook at a different speeds, so you can pull each piece off when it’s ready.

Benefits of cooking whole birds:

  • Whole birds take up less room on the grill than individual pieces.
  • Whole chickens provide an impressive “WOW!” factor when presented at the table.

Whole chickens cook best if the spine is cut out with kitchen shears or a sharp knife and the bird is pressed flat, a.k.a. butterflying or spatchcocking the bird. Opening up the bird gets smoke and rub to both sides of the meat. 

One of the last places to get cooked (no visible blood) is the leg-to-thigh knee joint. Popping the knee by overextending the leg-to-thigh joint makes for more even cooking. Fold back the wings. 

Seasoning

Up to two hours before cooking, apply your favorite seasoning or rub liberally to the chicken (see our Basic BBQ Rub recipe, below). One of the best ways to make super-flavorful chicken is to gently separate the skin from the meat and rub the spices directly on the flesh. The trick is to not break the skin when doing this!

Apply rub to all sides of the chicken. Individual pieces have the most surface area to absorb smoke flavor and for the rub to stick to. The best and easiest way is to toss the parts with rub in a large stainless mixing bowl. Again, peeling the skin back so the rub is directly on the flesh and then rolling the skin back over the rub improves flavor.

How To Keep Chicken From Burning

The secret to perfect barbecue chicken is to avoid putting raw meat directly over high heat. 

  • Chicken on GrillIn a charcoal grill, bank the fire at the outside edges and cook the chicken in the middle of the grill. 
  • On a gas grill with a single burner, keep the flame as low as possible to achieve temperature. 
  • On a gas grill with two or more burners, just light one burner and place the chicken over the unlit burner.

Add your favorite wood for smoke flavor (we prefer cherry or apple wood for chicken). With the lid down, ideal grill temperature is 300°F to 350°F.  The goal with the lid down is for a light blue smoke trail to waft from the cooker.

When Is It Done?

Boneless pieces can be cooked in approximately 20 to 30 minutes; bone-in pieces take 30 to 45 minutes. If you are cooking whole chickens, try not to peek for the first 45 minutes to an hour.  After an hour you are looking for internal meat temperatures approaching the final internal temps of 165°F for white meat and 175°F for dark meat (referred to as safe or proper temperature). 

  • Cook the chicken skin side up until temperature is reached. The thermometer should not touch the bone when taking a reading.
  • When cooking whole chickens or hind quarters, there should not be blood when you cut into the wing-to-body joint and the leg-to-thigh joint. These joints are the last two places to reach a safe temperature.
  • Some pink on the outside of the meat is normal. This is caused by charcoal and wood smoke, although this smoke ring can freak-out newbies to smoked food.

Crisping The Skin

After the chicken has reached its proper temperature, you can crisp up the skin by turning the chicken skin-down over higher heat. Check every thirty seconds, as it is easy to burn the skin.  Once the chicken skin is crisp and the chicken has achieved the desired temperature, you can glaze and finish with cool fire (225°F with the lid down) and the meat away from the heat; or remove from the heat and serve with sauce on the side.

Enjoy!

Brine & Rub Recipes


Not So Basic Brine

Mix and keep refrigerated (you can store it in a zip-lock bag); it will keep in the refrigerator for a week. Do not keep used marinade, discard after first use.

  • 1 cup Diamond Crystal Kosher Salt or 2/3 cup Morton’s Kosher Salt or ½ cup table salt (these varying volumes are all the same approximate weight of salt)
  • 1 cup white granulated cane sugar
  • 1 cup soy sauce or tamari
  • 1 cup real apple cider vinegar (watch out—small Heinz glass bottles contain “real” vinegar, but the gallon jug is “flavored”)
  • 1 gallon of water (or fill to 5 liter mark if mixing in a graduated container)
Kosher Salt
Photo of kosher salt courtesy of Saltworks.

Basic BBQ Rub

  • 2 tablespoons Diamond Crystal Kosher Salt or 1-1/2 tablespoons Morton’s Kosher Salt or 1 tablespoon of table salt
  • 2 tablespoons white granulated cane sugar
  • 2 tablespoons chili powder (light is preferable to dark)
  • 2 tablespoons Montreal or Canadian Steak Seasoning
  • Optional: add a pinch of cayenne (heat only) or chipotle (preferred because it adds heat and smoke flavor) to taste
Chili Powder
Red chili powder from India, the world’s largest producer of chili. Click here for more information about this fine powder.

Chicken Recipes


Italian Dressing Marinated Chicken

You can use your own recipe, but many a first-place trophy has been won using nothing more than store-bought Italian dressing as a marinade. Kraft® Zesty Italian and Wishbone® Italian are the two most popular. Some champion cooks use Newman’s Own Balsamic Vinaigrette. The process:

  • Marinate in the salad dressing in the refrigerator for 4 to 48 hours.
  • Don’t try to pat the chicken dry; just leave it wet with dressing.
  • Place the wet pieces on a baking sheet skin and sprinkle a light even coating of barbecue rub. At the grill, place the pieces skin up on the grate and sprinkle rub on the skin side to keep the rub on the skin from showing handling marks. Then cook with indirect heat, but don’t touch for at least a half hour so the rub can cook into the skin.

Smoked Rosemary Chicken

Follow the directions for Italian Dressing Marinated Chicken. Add a subtle hint of rosemary by poking a fresh spring through the grate directly over the flame or charcoal. The burning rosemary will emit a wonderful smoke aroma absorbed by the chicken. Replace the spring as needed. 

Quick & Easy BBQ Wing Appetizers

  • Pre-heat the grill to low (a test: count to five with your hand three inches above the grate—you should be able to reach five before your hand becomes uncomfortably hot).
  • You can use frozen wings as well as fresh. If frozen, start them straight on the grill. After 5 minutes turn and dust the warm side with rub, wait five minutes, turn and dust the other side with rub.
  • If your wings are thawed, toss in a bowl with rub no more than two hours before cooking.
  • Turn every ten minutes until the internal temp is 175°F.
  • Toss in a mixing bowl with sauce and serve.
  • By not saucing the meat on the grill, you reduce the risk of burning the meat.

Teddy Bear’s Spicy Chicken Glaze

Ingredients:

  • ½ cup Frank’s Hot Sauce
  • ½ cup BBQ sauce (try Famous Dave’s brand or make your own)
  • 2 tablespoons honey
  • 1 tablespoon BBQ rub (see our rub recipe or make your own simple blend of spices)
  • 1 teaspoon fresh ground black pepper
  • To taste, chipotle powder (smoke and heat) or cayenne powder (heat only, no smoke flavor)

Fire Roasted Tex-Mex Salsa (Great On Barbecue Chicken)

  • 12 large roma tomatoes or medium regular tomatoes
  • 5 to 10 jalapeños (the number depends on their heat—jalapeños grown with water stress [lack of water] are hotter)
  • 4+ cloves roasted garlic
  • ¼ cup chopped fresh cilantro
  • 1 medium red onion
  • ¼ cup lime juice
  • 2 tablespoons kosher salt
  • Fresh ground black pepper to taste
  • Chipotle to taste (adds heat and smoke)

Directions:

  • Cut the jalapeños in half down their length and remove stem and seeds
  • Peel and chop up the onion. Grilling the onion results in a milder and sweeter salsa which may be to your tastes, but some prefer the authentic taste with raw onions
  • Cut the top off a whole head of garlic and drizzle with extra virgin olive oil or use a tooth pick and make a mini skewer of 4 cloves. You always can use a roasted whole head of garlic in the kitchen later on.
  • Make a medium fire with mesquite for smoke.
  • Smoke-roast everything with the lid down to capture the smoke flavor, checking every 2 to 3 minutes.
    • Tomatoes: Grill until one side is just charred, then turn and lightly char the other side. Remove, cool and peel off skin
    • Jalapeños: Cook skin side down until the skin is blistering off. Remove, cool and peel skin. The reason they are cut in half is to absorb smoke flavor.  A little charred skin in the salsa adds to the flavor.
    • Garlic will take the longest; just put it at the edge of the heat and cook for 20 to 30 minutes.
  • Once the grilled items are cool, rough-chop everything. If you want to use a blender, only blend half the mix to leave some larger chunks for texture.  
  • Test for seasoning and adjust as needed. Enjoy with warm corn tortilla chips or on top of anything barbecued. 

Barbecue Classes and Instruction

GrillBackyard barbecue fans who want more in-depth training on their specific equipment or on the general science of barbecue have several options for classes and online information. Here are some recommended websites:

The BBQ Institute  

This site was developed to help guide cooks through the basics of barbecue, and has an in-depth section on preparing and cooking ribs. The BBQ Institute offers hands-on classes in Washington and California and is always adding new classes to the schedule.

Weber Nation

Weber offers training videos featuring interesting menus for entertaining around the backyard barbecue.

Barbecue Bible   

Steve Raichlen is the featured chef at BBQ University, held at the Greenbrier Resort in White Sulphur Springs, West Virginia.

Check the availability of barbecue classes through your local colleges and barbecue retail stores.


Best Barbecue Books

The Barbecue Bible Barbecue Secrets How To Grill
The Barbecue! Bible, by Steven Raichlen. Raichlen has a lock on grilling. This book is absolutely overwhelming it is so deep, so comprehensive, so far-reaching, so all-encompassing. More than 500 recipes that can be cooked on a grill. A must-have book for any home cook hoping to expand his or her grilling horizons. Click here to purchase or for more information. Barbecue Secrets: Unbeatable Recipes, Tips and Tricks from a Barbecue Champion, by Ronnie Shewchuk. “Rockin' Ronnie” Shewchuk, international barbecue champion, is ready to share his secrets and recipes with backyard cooks everywhere. More than 100 recipes for rubs, marinades and sauces, side dishes, seafood, desserts, and drinks. Click here to purchase or for more information. How to Grill: The Complete Illustrated Book of Barbecue Techniques, by Steven Raichlen. Every conceivable meat, fish and fowl get its turn over the coals, with all the basics covered for the beginner as well as new ideas for the more seasoned cook. How about a whole barbecued cabbage stuffed with bacon and onion. Click here to purchase or for more information.

Recommended Smokers

There’s a great list of smokers on BBQ Guru website. Also check out:


© Copyright 2005-2008 Lifestyle Direct, Inc. All rights reserved. Images are the copyright of their respective owners.


.